Master the basic sashimi cuts now! You only need to know a few simple cutting techniques used for most classic sashimi types. Almost everyone heard about sashimi, but the real beauty of it (as it often is with Japanese cuisine) lies in the techniques which are used for making great sashimi. Traditionally, the real sashimi master learns its skills for a few years, but we will try to give you a quick and easy to understand sashimi crash course! Now sharpen your sashimi knives, and let’s jump right into the great, big, frightening ocean of sashimi!
What is Sashimi?
First of all, sashimi is not sushi, never was, never will be! Yes, we know that you know, that we know that you know, but again, sashimi is not sushi! Sashimi is always the best fresh raw fish served without rice, filling or seaweed and represents the purest form of Japanese raw ingredient cooking culture. The big difference in sashimi is the preparation and serving of the raw fish, which is different in many ways, but today we’ll talk about one aspect of it, the basic types of sashimi cuts.
The basic sashimi cut types!
Because of the delicate character of sashimi, certain cutting techniques evolved over time. With these “classic” sashimi cuts, the chef tries to highlight the delicate flavor and texture of the various ingredients (mostly fish). Therefore, the sashimi chef perfectly understands the differences in various fish types and its meat characteristics. The fish meat is tougher or softer, compact or loose, has more or less fat etc., and every cut should be used precisely to bring forward the best character of sashimi. Because of this reason there are 5 basic sashimi cuts called: hira-zukuri, sogi-zukuri, usu-zukuri, kaku-zukuri and ito-zukuri cut. We’ll explain each cut in detail below …
Which knife to use for different sashimi cuts?
Usually the sashimi knife (or sashimi bocho in Japan) is used for making sashimi. The knife has a pointed end (although some types have rectangular ends, they are used mainly for octopus sashimi). The sashimi knife is elongated, thin and sharp, therefore perfect for making really clean cuts in one motion. If you walk around the streets, you will often find Santoku knives, which are mostly all-purpose, but sometimes they are also used for sashimi (especially on the streets). The knife is really sharp, and it’s used in one continuous cutting motion! This basic cut is caried out almost as if you would hold a saw. But more about it you’ll find below …
Right-handed or left-handed? The different approach …
It’s very important to know the direction of your cut. For example, if you cut your prepared fish fillet from left to right, you won’t get the same cuts as if cutting the same fish in the opposite direction. Often the fish isn’t cut straight, but has a slight angle facing left or right, and that’s where you need to know your cutting directions. Our guide is made for right-handed people, but if you’re left-handed just invert our instructions!
The basic sashimi cutting motion!
First, we need to learn the basic cutting motion of sashimi. Every other cut uses the basic motion, but with additional finesse. For the basic motion always use your sharp sashimi knife! To carry out the cut imagine holding a saw. When you’re sawing something, you begin with the part of the saw blade closest to you, and with one continuous motion end with the part furthest from you. That’s exactly the motion of the basic sahimi cut! You first begin with the base of the knife blade nearest to you, then cut in one motion to the part of the knife (top) furthest away! It sure takes a little practice, but you can learn this cut in just a few minutes! And now you know the basic sashimi cutting technique!
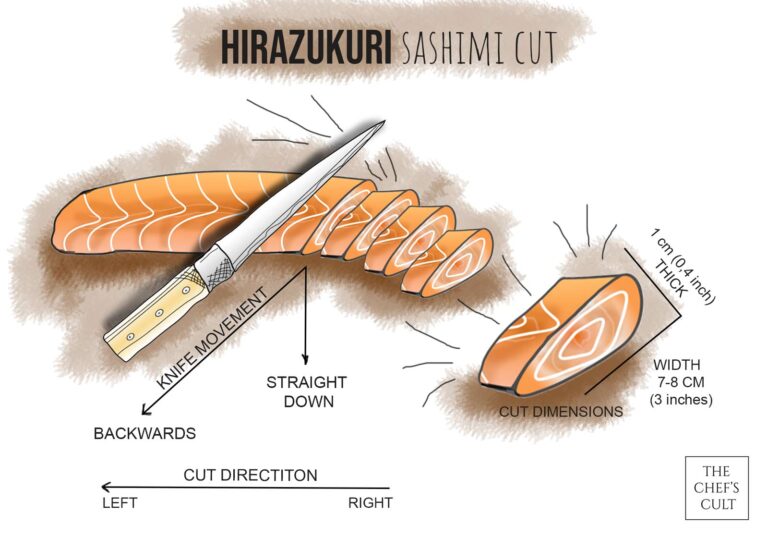
Hira-zukuri – the basic sashimi cut!
The hira-zukuri is the standard cut for sashimi. If you ever ordered sashimi somewhere around the world there’s almost 99% chance you saw the hira-zukuri cut sashimi. Hira-zukuri means “flat slice” and it’s the dimensions of a domino, to be more exact 10 mm thick and 7-8 cm long. The cut is made in one motion, and mostly (depending on fish fillet size and character) this motion is straight down with no angle. Just straight down, but with the basic “saw-like” sashimi cutting motion. The cutting is always done from right to left. This cut is used for robust and “strong” fish like tuna and salmon. When serving your sashimi in the hira-zukuri style cut, always serve the sashimi in the natural position and order of the fish fillet.
Sogi-zukuri – serving on the side of the skin!
The sogi-zukuri cut is used almost solely for white-meat fish like snapper. The fish fillet is laid down so that the skin side of the fillet is facing towards you. The cutting direction is from left to right and the angle of the cut is about 40° (slight angle). The dimensions of this cut are similar to the hira-zukuri cut. The sashimi is served in the natural position and order of the fish fillet, the same way as the hira-zukuri cut sashimi.
Usu-zukuri – thinly sliced sashimi!
The usu-zukuri sashimi cut is one of the hardest to master! The usu-zukuri cut is the thinnest sashimi cut and requires some practice time. The cutting technique is similar to the sogi-zukuri, but the sashimi pieces should be as thin as possible. The cutting direction is from left to right and the angle of the cut is about 40° (slight angle). The most important thing here is fixating the fish fillet with your left hand and applying the basic sashimi cutting motion with your right hand. It takes a little practice, but not every sashimi master is born right away! The cut is approximately 50 mm (2 inch) long and 2 mm (1/16 inch) wide. It’s used for firm textured fish like flounder and bream. One of the most famous dishes in Japan the” toxic” puffer fish sashimi (or “fugu sashimi”) is made with this technique. The fish is cut in usu-zukuri style, and the slices are very thin, almost translucent!
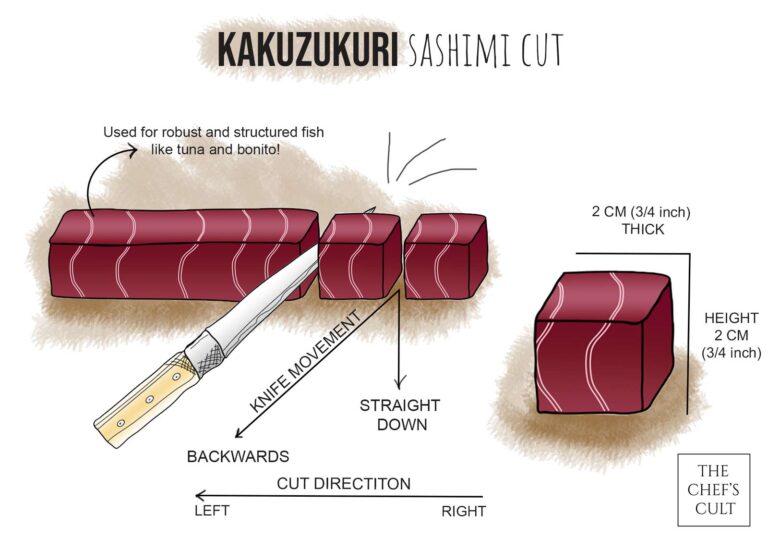
Kaku-zukuri – the square cut!
The kaku-zukuri cut is used mostly for one fish only – tuna. That’s because of the firmness and compact structure of tuna fish meat. The cut is very similar to the basic sashimi cut – hirazukuri! The big difference is only in the preparation of the tuna fish fillet – where it’s formed in a cuboid shape. Nothing is thrown away; the remaining tuna pieces are formed either in usuzukuri or hirazukuri style sashimi! The classic dimensions for kaku-zukuri cuts are 2 x 2 cm ( ¾ inch) and the cuts should look like a perfect cube!
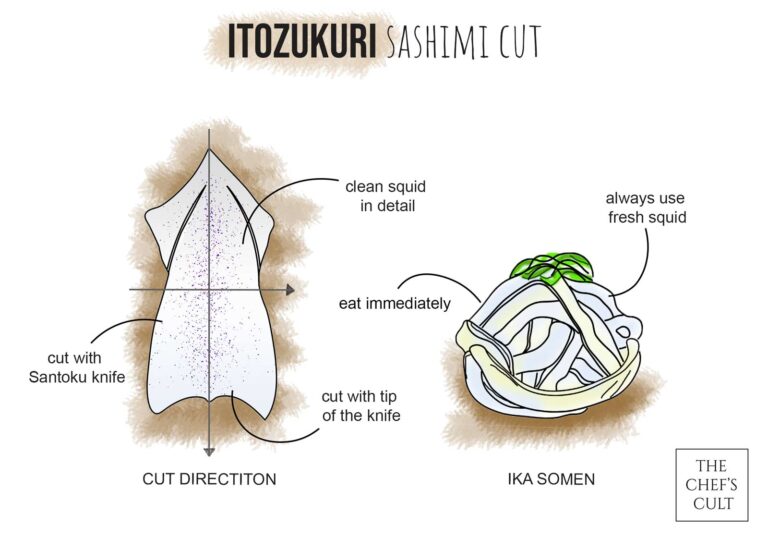
Ito-zukuri – the squid cut!
The ito-zukuri cut is used mostly for squid, which is served in thin slices mounted on top of each other, resembling noodles. First the squid needs to be properly cleaned and prepared for cutting (remove intestines, skeleton, and skin layer). The cut can be done in two ways either horizontal or vertical (for longer slices). The important thing here is cutting straight down with the TOP of the knife (either sashimi knife or santoku). With straight and fast cutting motions you will get thin slices of squid (noodles) that are served on top of each other. This cut is very popular in the street food genre, where the squid is often processed still alive (yes, we do not intervene with culture here) and eaten immediately.
That’s it for today my little sashimi-knife-bending-samurai! We hope you learned the technique behind the basic sashimi cuts! With just a little practice you can soon become a true sashimi master, and if not, at least you learned quite a few things about professional cuisine knife action! We know that knowledge is our driving force! Cheers to that!